The TextCRM Widget is a powerful tool for integrating a centralized communication system into your website. It allows companies to connect with their customers via a chat interface for seamless support. Follow these steps to set up and implement the widget on your website based on the provided details.
Steps to Set Up the TextCRM Widget
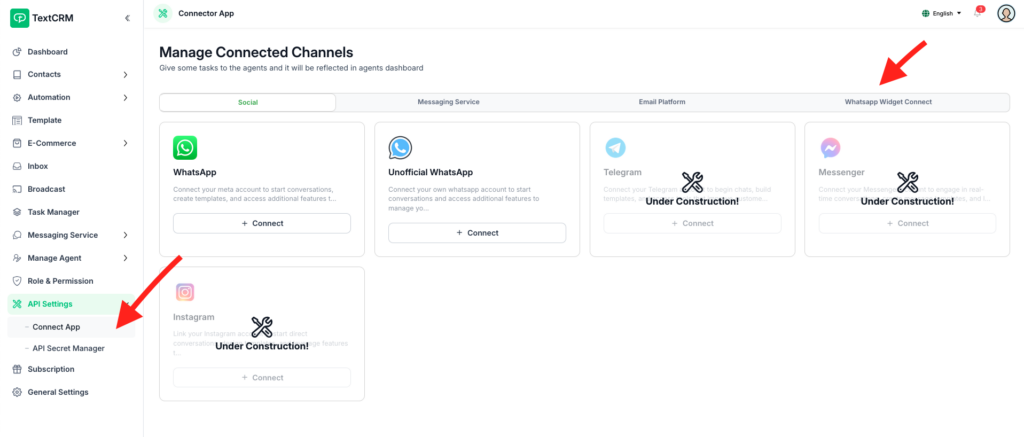
Step 1 : Navigate to the API Setting & Click Connect App menu in the main navigation bar.
Step 2 : Click Whatsapp Widget Connect Tab.
Step 3 : Select Chat Panel Type
In the Widget Design page:
- Locate the dropdown labeled Select Chat Panel Type.
- Choose one of the following options:
- Only WhatsApp: Integrates only WhatsApp chat.
- Only TextCRM: Enables TextCRM chat support.
- Both: Combines WhatsApp and TextCRM chat interfaces.
Based on your selection, the panel options will adjust to include the relevant settings
Step 4 : Customize Widget Design
Brand Color:
- Select a Brand Color that aligns with your company’s branding.
- This color will be applied to the widget’s interface.
Icon & Text Color:
- Choose a color for the icons and text to ensure clear visibility and consistency with your branding.
Panel Header Settings:
- Panel Header Heading: Add a title for the widget, such as “Team TextCRM.”
- Panel Header Message: Write a short message for customers, like “Ask us anything. We’ll reply as soon as possible.”
- Customize the Header Heading Text Color and Header Message Text Color to match your theme.
Panel WhatsApp Settings (if WhatsApp is enabled):
- WhatsApp Panel Button Text: Add a label for the WhatsApp button, e.g., “Open WhatsApp.”
- WhatsApp Panel Body Text: Write a description, such as “Reach us on WhatsApp! Start a conversation below.”
- WhatsApp Message Text: Predefine a message that customers can send, e.g., “Hello!”
Logo Upload:
- Drag and drop your company logo into the upload box or select a file from your computer.
Step 5 : Select a Template
From the Template Select dropdown, choose a pre-configured widget template if available.
- This allows for faster setup using predefined designs.
- You must have an existing template created in Meta. Without it, you cannot create both the TextCRM Widget and WhatsApp functionalities. You will only be able to set up WhatsApp.
Step 6 : Choose Widget Position
Select the Widget Position:
- Options include positions like Bottom Right or other common placements.
- This determines where the widget appears on your website.
Enable Bounce Animation:
- Check this box to add an animation effect to the widget for better visibility and engagement.
Step 7 : Preview the Widget
The Live Preview section displays a real-time preview of your widget design.
- Review how it will appear to your website visitors.
- Make any necessary adjustments to the settings for better alignment with your branding.
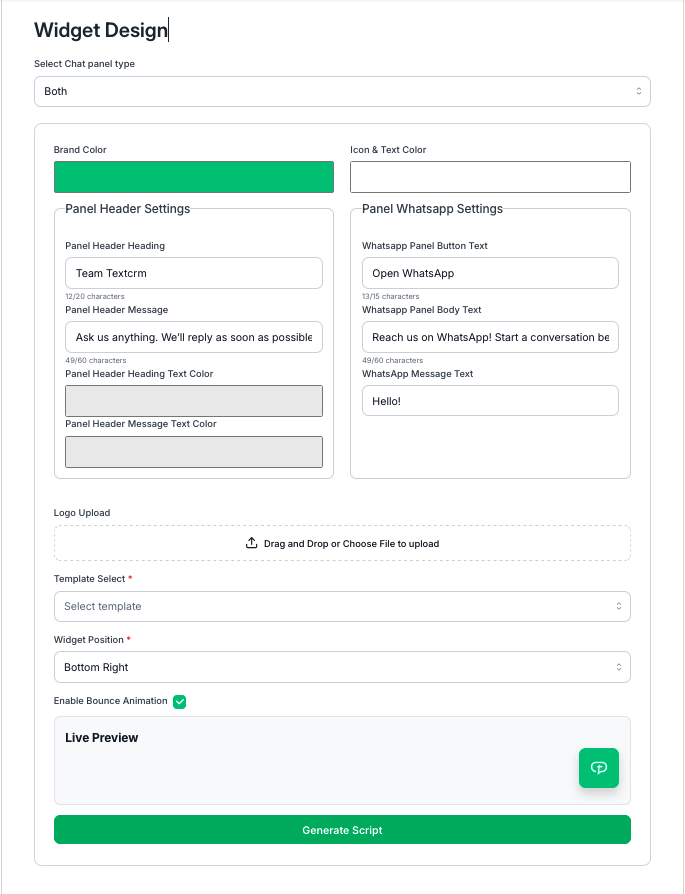
Step 8 : Generate and Add Script
- Once satisfied with the widget design, click the Generate Script button at the bottom of the page.
- A script will be generated for embedding into your website.
- Copy the generated script.
- Add the Script to Your Website:
- Paste the script into the footer section of your website.
- This ensures the widget loads on every page for easy customer access.
Benefits of the TextCRM Widget #
- Centralized Communication:
- Manage all customer interactions from a single platform, including WhatsApp and TextCRM chat.
- Customizable Design:
- Fully tailor the widget to align with your company’s branding.
- Improved Engagement:
- The widget’s visible placement and animation make it easier for customers to initiate contact.
- Seamless Integration:
- Simple script integration enables quick setup on any website.
Outcome #
After completing these steps, your TextCRM Widget will be live on your website, providing customers with an intuitive and centralized way to communicate with your team. This will enhance customer support and streamline interactions for your business.


